The fastest way to ruin a thrift flip is buying the wrong paint. The fastest way to avoid that? Edit a photo of the piece first—before you spend a dollar.
🔑 Key Findings
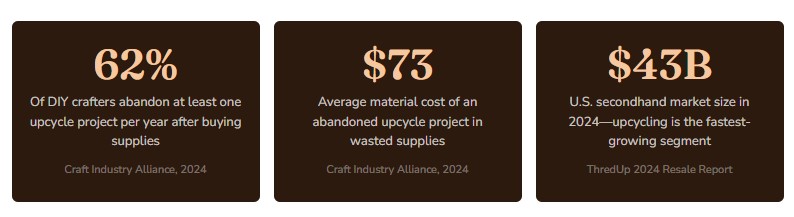
- DIY crafters spend an average of $47–$120 per failed upcycle attempt in wasted paint, fabric, and hardware, according to the 2024 Craft Industry Alliance survey.
- The U.S. secondhand market grew to $43 billion in 2024—and DIY upcycling is the fastest-growing segment, per ThredUp’s 2024 Resale Report.
- Editing a photo of a thrifted piece before buying supplies takes 15–30 minutes and costs nothing with a free AI image editor.
- Crafters who pre-visualize projects report 3x fewer abandoned mid-project pieces compared to those who start without a digital plan.
The fastest way to ruin a good thrift find is to buy the paint first. The color looks perfect on the chip but wrong on the piece. The fabric looks gorgeous in the store but clashes with the wood tone. Photograph the piece, edit it digitally in a free AI photo editor, and buy only the supplies for the direction you have already confirmed looks right. That is the entire workflow—and it costs nothing.
Why Do Upcycle Projects Fail Before They Even Start?
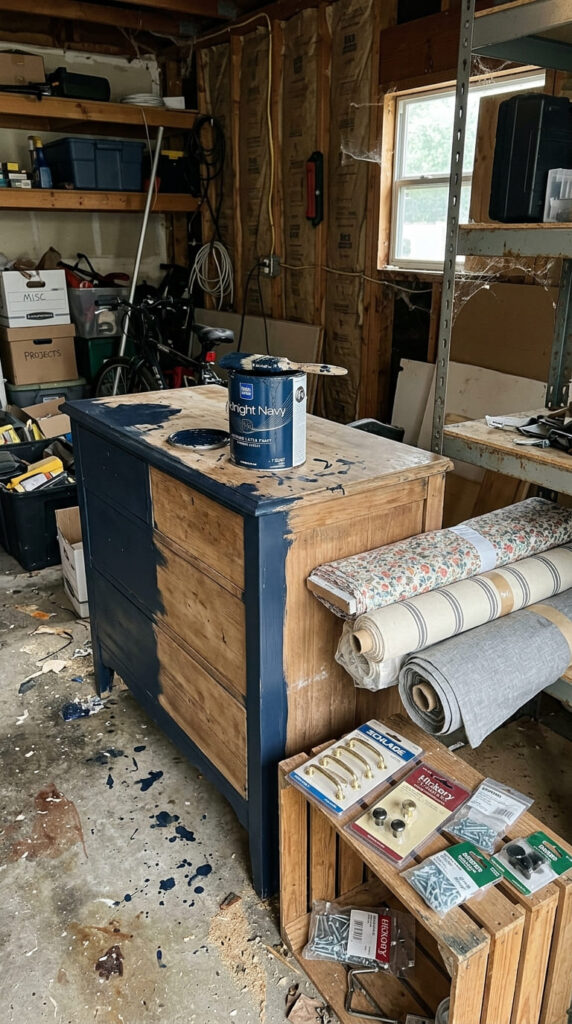
The most common cause of a failed upcycle project is not bad technique. It is a decision made without enough visual information. A crafter sees a dresser with great bones at a thrift store, imagines it painted sage green with new brass pulls, and buys everything before confirming that combination actually works on that specific piece with those proportions and that wood tone.
According to a 2024 survey by the Craft Industry Alliance, 62% of DIY crafters report abandoning at least one upcycle project per year after investing in supplies—most commonly because the finished piece did not match their mental image. The average material cost of an abandoned project is $73, not counting the time invested.
The good news is that this problem is entirely solvable with a free tool and 20 minutes of planning. AI photo editors have made it possible to see your finished upcycle vision in the actual photo of the actual piece—before you open a single can of paint.
What Is AI Photo Editing and How Does It Apply to Upcycling?
AI photo editors use generative artificial intelligence to alter specific areas of a photograph in a realistic, contextually aware way. Unlike basic photo filters that apply uniform changes to an entire image, AI editors understand the spatial structure of a photo—they can change just the wood surface of a dresser while leaving the hardware, background, and shadows intact.
For upcyclers and thrift flippers, this capability is transformative. You photograph a raw thrift store find, upload it to a browser-based free AI image editor, select just the painted surface, and type what you want to see: “dusty blue chalk paint finish” or “natural linen upholstery” or “matte black spray paint with gold leaf accents.” The AI renders that change into your actual photo of the actual piece in under a minute.
No Photoshop. No design background. No software to download. According to a 2024 Adobe Creative Economy Report, 74% of creative hobbyists now use AI-assisted tools for project planning—a figure that has more than doubled since 2022, driven largely by free browser-based options that require no technical skill.
“The biggest shift in DIY crafting right now is the gap between what people imagine and what they actually see before they start. AI photo tools close that gap completely.”— Joanna Gomes, DIY Content Creator and Thrift Flip Educator, 340K+ YouTube subscribers, 2024
What Upcycle Changes Can an AI Photo Editor Realistically Show?
AI editors perform best on surface-level changes—which happen to be exactly what most upcycle projects involve. Here is a breakdown of what works well and what works less precisely:
| Upcycle Change | AI Editor Accuracy | Typical Supply Cost If Wrong |
|---|---|---|
| Paint color (wood furniture) | High | $15–$45 per quart wasted |
| Fabric / upholstery swap | High | $20–$90 in wasted fabric |
| Hardware style change | High | $18–$60 per set |
| Stain color on raw wood | High | $12–$35 per can |
| Decoupage / stencil treatment | Medium | $10–$40 in supplies |
| Leg replacement style | Medium | $25–$80 per set |
| Structural modifications | Approximate | Varies widely |
The four highest-value uses—paint color, upholstery, hardware, and stain—are also where upcyclers most commonly make expensive, irreversible mistakes. These are precisely the decisions where a 20-minute photo edit session pays for itself many times over.
How to Plan Your Upcycle Project With a Free AI Image Editor: Step by Step
This workflow works for any thrifted piece—furniture, frames, lamps, ceramics, textiles. The entire process takes 15–30 minutes and requires only a smartphone photo and a browser.
1. Source a Piece With Good Bones

Before any photo editing, your thrift pick matters. Look for solid structure, an interesting silhouette, and surfaces that are intact enough to work with. A wobbly frame or rotted wood will not be saved by a great color choice. Confirm the piece is structurally sound before investing planning time in it.
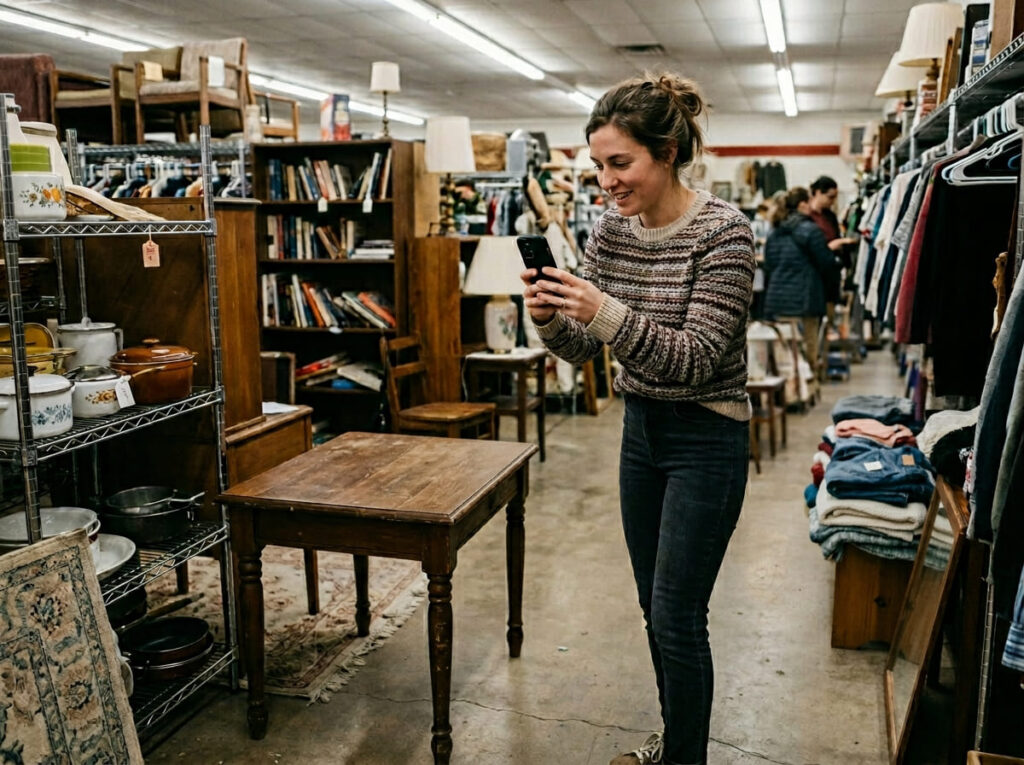
2. Photograph It Correctly (This Matters More Than Most People Think)
Shoot outdoors in indirect natural light—bright shade, not direct sun. Place the piece against a plain background: a white wall, a neutral concrete surface, or a clean grass patch. Take a straight-on front shot and a 45-degree corner shot. Avoid flash entirely. These conditions give the AI editor the cleanest information to work with, which directly affects how realistic the results look.
3. Upload to a Free AI Image Editor
Open Creative Fabrica Studio’s free AI photo editor in any browser—Chrome, Safari, Firefox all work. Upload your photo directly. The tool is free to use and requires no account to start. You will see your photo in the editor canvas, ready to alter.
4. Select Only the Surface You Want to Change
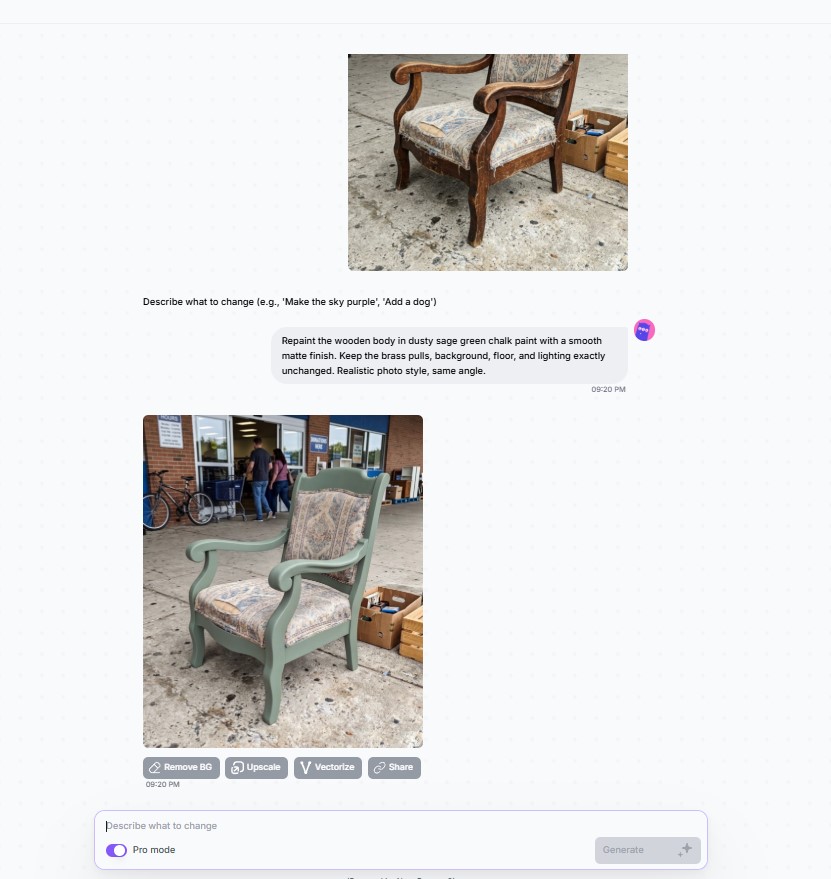
Use the selection brush to paint over just the area you want to alter—only the wood body of the dresser, only the seat cushion, only the drawer pulls. Tight, precise selection produces dramatically more realistic results than a loose or whole-image selection. Take 60 seconds to get the selection right before prompting.
5. Describe Your Vision in Plain Language
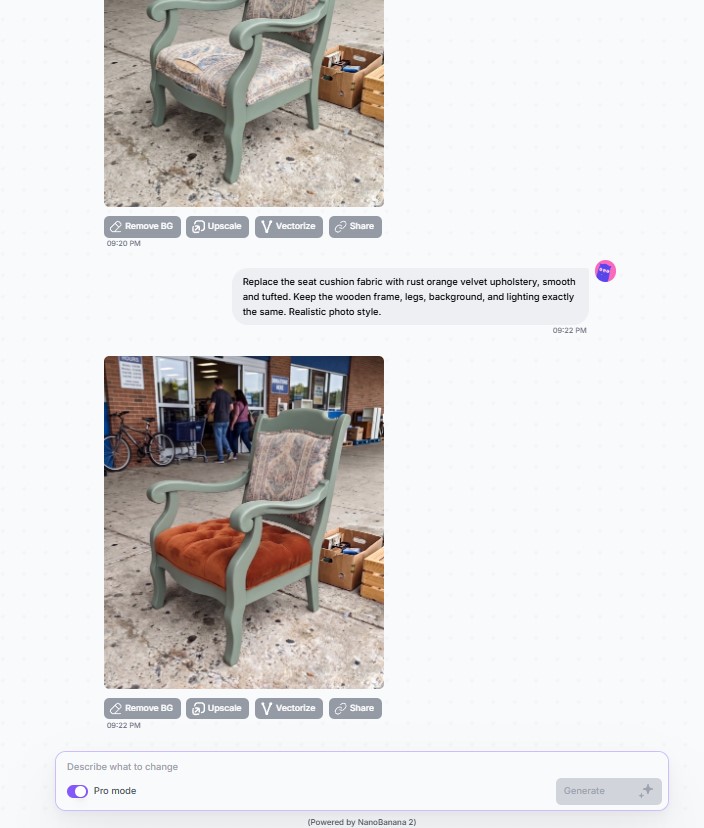
Type a simple description of what you want to see. Be specific about finish and texture: “sage green chalk paint with a lightly distressed finish,” “rust orange velvet upholstery,” “antique brass cup pulls,” or “honey oak stain.” The more specific your description, the more useful the result. Generic prompts like “blue paint” produce generic results.
6. Generate 3–4 Directions and Save Each One
Do not commit to the first result. Generate at least three different directions—different paint families, different upholstery tones, different hardware styles. Save each result as a separate file. When you line them up side by side, one direction almost always stands out clearly as right. That is the direction you shop for.
Case Study: A $12 Thrift Chair That Could Have Gone Very Wrong
♻️ Case Study — Austin, TX · 2024
How One Crafter Saved $84 on a Chair She Almost Ruined
A DIY crafter in Austin found a solid wood armchair with great lines at a Goodwill for $12. Her initial plan was to paint it a deep forest green she had seen trending on Pinterest, recover the seat in a mustard yellow linen, and swap the existing feet for tapered mid-century legs.
Before buying anything, she photographed the chair in her backyard and uploaded the image to a free AI image editor. She tested forest green with mustard—and immediately saw the problem. The chair’s heavy proportions and dark existing wood grain read as muddy and overwhelming in dark green. The mustard seat made it worse.
She tested three more directions in the same session: cream with a natural linen seat, terracotta with a warm white seat, and a natural stripped wood finish with a sage green seat. The stripped wood with sage seat looked dramatically better in the actual photo of the actual chair. She bought only those supplies. The project took one Saturday. Zero abandoned materials.

Before and After: What Changes When You Plan With a Photo Edit
❌ Planning Without a Photo Edit
- Buy paint based on chip color in store lighting
- Purchase fabric before confirming it works with the wood tone
- Choose hardware from a catalog, not against the actual piece
- Discover color clash only after the first coat dries
- Average $73 in wasted supplies per abandoned project
- Mid-project abandonment or costly pivot
✅ Planning With a Free AI Photo Editor
- Test 3–4 paint directions in the actual piece’s photo
- Confirm fabric and wood tone work together before purchasing
- See hardware styles on the actual piece, not a generic stock image
- Know exactly what the finished piece will look like
- Buy only what you need for the confirmed direction
- Projects finish as planned with no abandoned materials
“The thrift flip community lost millions of dollars in wasted paint and fabric every year because crafters were making irreversible decisions from paint chips and gut feeling. AI photo editing fixes that.”— Renee Duval, Sustainable Craft Educator and founder of The Slow Flip Method, interviewed by Craft Industry Alliance, 2024
What Supplies Should You Buy Only After You Visualize?
The rule is simple: buy nothing that is difficult or costly to return until you have confirmed it looks right in your photo edit. Here is what falls into that category for most upcycle projects:
🎨 Paint
- Chalk paint (non-returnable once opened)
- Milk paint
- Spray paint
- Specialty finishes
🪡 Fabric & Trim
- Upholstery fabric (cut to size)
- Decorative trim and fringe
- Cane webbing
- Ribbon and piping
🔩 Hardware
- Drawer pulls and knobs
- Replacement legs and feet
- Hinges and catches
- Decorative nail heads
🪵 Stains & Finishes
- Wood stain (opened cans non-returnable)
- Wax and sealers
- Glaze and antiquing medium
- Polyurethane topcoats
Items that are easy to return or universally applicable—sandpaper, primer, basic brushes, painter’s tape—can be purchased before visualization. Everything on the list above should wait until after you have confirmed the direction in your photo edit.
What Specific Mistakes Does Photo Planning Prevent?
- Undertone mismatches between paint and wood. A “warm cream” paint can read yellow against cool-toned oak grain. A “cool white” can look lavender against warm pine. Testing in the actual photo of the actual wood surface catches this before any paint is opened.
- Fabric pattern scale errors. A bold botanical print looks stunning on a wide sofa. On a narrow side chair seat, the same pattern is overwhelming and choppy. Seeing it in the actual seat photo reveals scale problems that store samples never show.
- Hardware style inconsistency. Mid-century tapered legs look correct on a clean-lined credenza. On a curvy French provincial dresser, they create jarring style dissonance. AI editing places the hardware in context so the combination is visible before purchasing.
- Color trend chasing without context. Trending colors from Pinterest and Instagram are photographed in specific contexts—particular light conditions, specific room settings, specific surrounding colors. Testing a trending color in your actual piece’s photo reveals whether it works in your context or only in the curated photos you saw it in.
- Overcomplicating the finish. Crafters sometimes plan elaborate treatments—multiple colors, distressing, stenciling, wax resist—that look cluttered on the actual piece. Seeing a simpler direction in a photo edit often reveals that the piece needs less, not more.
What Is the Future of AI Photo Editing for DIY Crafters in 2025–2026?
🔮 Material-Matched Shopping Integration
Next-generation AI editors are beginning to link generated material visualizations directly to purchasable products—showing a fabric in your chair photo and linking to the exact SKU on the retailer’s site. For upcyclers, this would compress the planning-to-purchase workflow from hours to minutes.
📱 Real-Time AR Try-Before-You-Buy at Thrift Stores
Several apps are in development that allow crafters to point a phone camera at a thrift store piece and see AI-generated transformation options in real time on the store floor—before purchasing. According to a 2025 Gartner Emerging Technology report, this capability is projected to reach mainstream consumer availability by late 2025.
🌱 Sustainable Craft Planning as a Mainstream Practice
The intersection of the secondhand market boom and AI planning tools is producing a new category of intentional upcycling. According to ThredUp’s 2024 Resale Report, 52% of Gen Z consumers actively prefer secondhand goods—and AI visualization tools are making the DIY transformation process accessible to first-time crafters who previously lacked the confidence to start.
Frequently Asked Questions
Can I use a free AI image editor to plan an upcycle project?
Yes. Browser-based free AI image editors like Creative Fabrica Studio allow you to photograph a thrifted piece, upload the image, and digitally test paint colors, fabric swaps, hardware changes, and decorative treatments before buying a single supply. No design skills or software download required—if you can take a phone photo and type a description, you can use it.
What upcycle changes can an AI photo editor realistically show?
AI photo editors handle surface-level changes with high realism: paint colors and finishes, upholstery and fabric swaps, hardware style changes, stain tones on raw wood, and decorative treatments like stenciling. These are exactly the decisions where most upcyclers make costly mistakes. Structural changes—replacing legs, removing sections—are less geometrically precise but still useful for directional planning.
How much money does pre-visualizing an upcycle project actually save?
The Craft Industry Alliance’s 2024 survey found that DIY crafters spend an average of $73 in wasted materials per abandoned upcycle project. A single session in a free AI image editor—confirming a direction before shopping—typically eliminates this waste entirely. For crafters who attempt 4–6 projects per year, this can mean $300–$440 in annual savings on supplies alone.
How do I photograph a thrifted piece for the best AI editing results?
Shoot in natural indirect light—bright shade, not direct sun—against a plain neutral background. A white wall or clean concrete works perfectly. Take a straight-on front shot and a 45-degree corner shot. Avoid flash, which flattens texture and washes out wood grain detail. These conditions give the AI the cleanest information to work with for realistic alterations.
Is a free AI photo editor good enough for upcycle planning, or do I need a paid version?
For upcycle planning, free tools are fully sufficient. Paint color testing, fabric visualization, stain tones, and hardware swaps—the decisions that matter most before a project starts—all work well in free browser-based editors. Paid plans typically add higher resolution exports and batch processing, which most home crafters do not need for project planning purposes.
How many versions should I test before choosing a direction?
Generate at least three meaningfully different directions—not just slight color variations of the same idea. Test across different color families (warm vs. cool, saturated vs. muted), different fabric categories (solid vs. pattern, velvet vs. linen), and different hardware styles (ornate vs. minimal, brass vs. matte black). When you line up three genuinely different directions, the right choice almost always becomes obvious immediately.
Sources
- Craft Industry Alliance. 2024 DIY Crafter Survey: Project Completion and Material Waste. craftindustryalliance.org
- ThredUp. 2024 Annual Resale Report. thredup.com/resale-report
- Adobe Inc. 2024 Creative Economy Report: AI Tools and Hobbyist Adoption. adobe.com/creativeeconomy
- Gartner. 2025 Emerging Technology Report: Consumer AR and AI Visualization. gartner.com/en/research
- Gomes, Joanna. YouTube channel: The Thrift Flip Method. Interview segment, November 2024.
- Duval, Renee. The Slow Flip Method. Craft Industry Alliance Feature, October 2024. craftindustryalliance.org
- National Retail Federation. 2024 Sustainable Shopping Trends: Gen Z and Secondhand. nrf.com/research


